


I don’t know about you, but I use a Windows workstation while at home and when away from home, I take a Windows laptop. Both are connected to my network when at home. Similar applications are installed on both my workstation and my laptop, including MS Outlook, so I can handle all my different email accounts from one application, regardless of which one I’m using.
Today, over on MakeUseOf.com, I read an article about “How to Export Emails from Outlook” over on MakeUseOf.com. While that was interesting, I’ve found a better way of dealing with transferring a current copy of all of my PSTs between my workstation and my laptop. I just change “where” all those PSTs are stored and use “Syncback” from 2BrightSparks.com whenever I’m getting ready to leave, and then again when I get back.
Setting Up a single PST location in Outlook
First off, I don’t like keeping my mail on my operating system drive. If it should go belly up (and I’ve had that happen a few times over the years), I’d lose all that mail. I also have multiple email accounts. I like using different accounts for different types of mail. All of my email accounts (Yahoo, Ymail, Gmail, Live, Outlook and email from my own web space) are all set up as and brought into Outlook as “pop” mail.
I needed a common location in which to store those various PST email files, so I set up a folder on a separate data drive and called it “MyMail.” So, let’s move the mail from where Outlook wanted to store it to where I want to store it.
|
1. Click on the “File” menu |
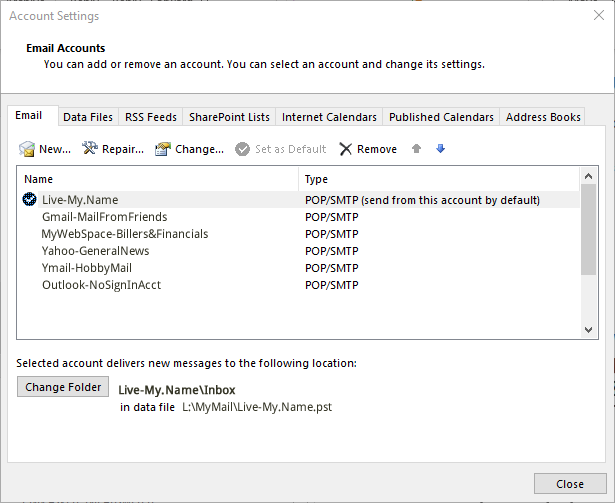
| 2. Click on the Account Settings button and select “Account Settings”
|
|
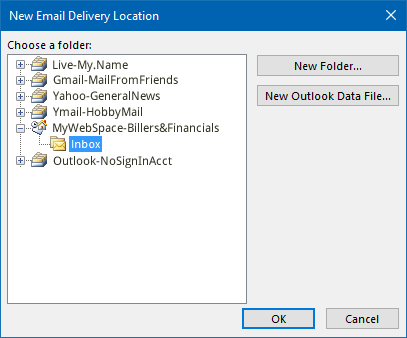
3. In the list, click to highlight the email address that you want to “move.” In the section below the list, it will show where it’s currently located. Click the “Change Folder” button. |
|
4. Ensure the correct “inbox” is highlighted and then click the “New Outlook Data File” button |
|
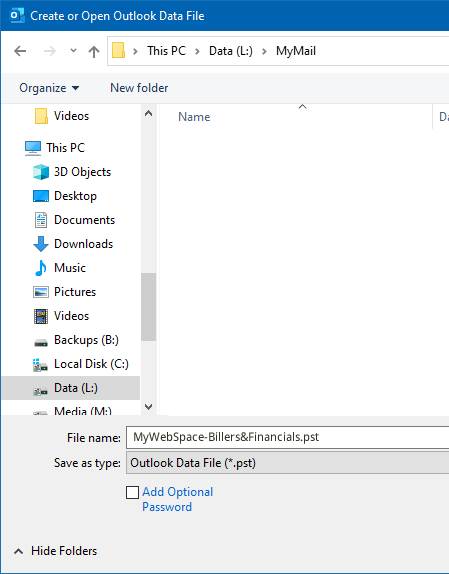
5. Navigate in the Explorer window to the “MyMail” folder you set up and name or rename the PST file name as appropriate. |
|
6. Repeat the process for each PST file until you have all of your PST files re-created in your “MyMail” Folder. |

TRANSFERRING COPIES BACK AND FORTH BETWEEN PC AND LAPTOP
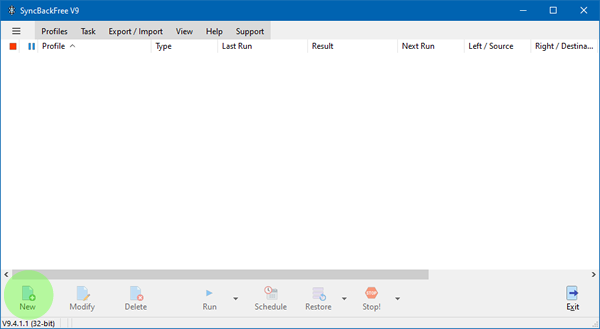
Okay. Now that we’ve got all of our Outlook Mail PSTs located in one folder we can easily locate and backup to and from whenever needed, go get “Syncback” and install it.
|
1. Run Syncback. Upon opening, you should see this screen. Click the “New” button. |
|
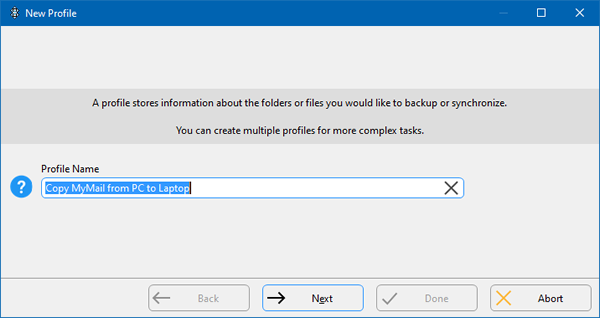
2. Create a name for your profile. In this case, I’ve named mine: “Copy MyMail from PC to Laptop” |
|
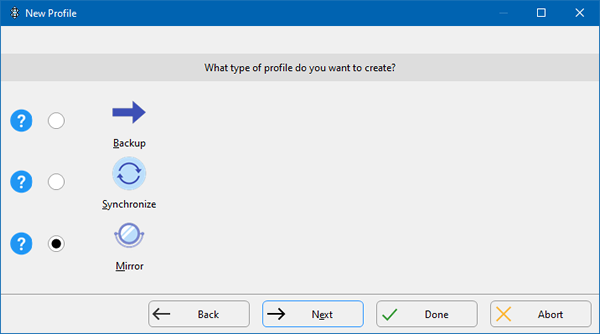
3. The next screen will ask you what type of profile you will be creating. Since my primary PSTs are located on my workstation PC, I will select MIRROR which will create a duplicate of my PC PSTs on my Laptop. Click DONE. |
|
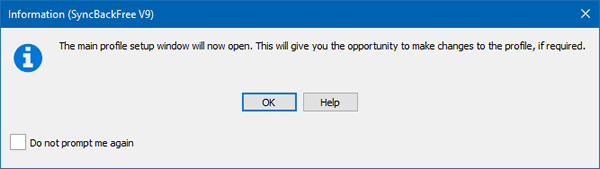
4. An informational window will open on the screen replacing the previous window. Click OK. |
|
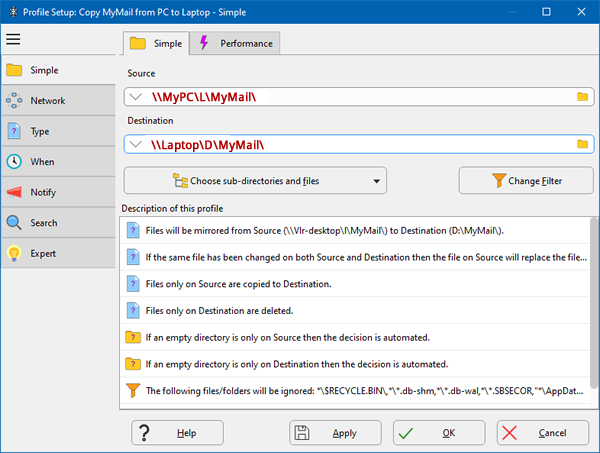
5. In the source field, click on the folder icon and navigate to and select the MyMail folder on your PC |
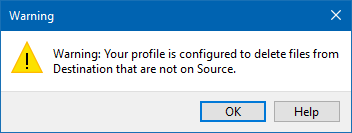
| 6. A warning will appear explaining that you’ve just created a profile that will delete files from the destination. Yes, that’s what we anticipated this profile would do.
|
|
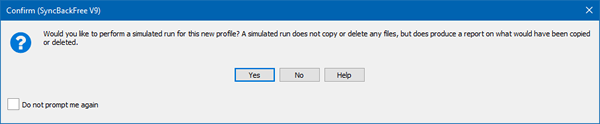
7. A confirmation window will appear on your screen asking you if you want to do a “simulated run” where it does not copy or delete files. You can choose to run it or not. If you choose to run it, it will show you what it would do if you were actually running this profile. [NOTE: Once you’ve deposited filed in the laptop folder and RUN the profile a subsequent time, it will bring up a window showing you what it expects to delete and what it expects to copy, and asks for your permission before doing so. If something is amiss, it’s giving you a chance to cancel and make changes to your profile before running it again.] |
|
8. Once you’ve completed that step, it will take you back to the main window and you’ll see that there is now a pre-defined profile listed. Repeat the steps to create a second profile named “Copy MyMail from Laptop to PC” and switch the SOURCE in step 5 to your Laptop, and the DESTINATION to your PC. |
|
9. Highlight the “Copy MyMail from PC to Laptop” profile and then click RUN. |
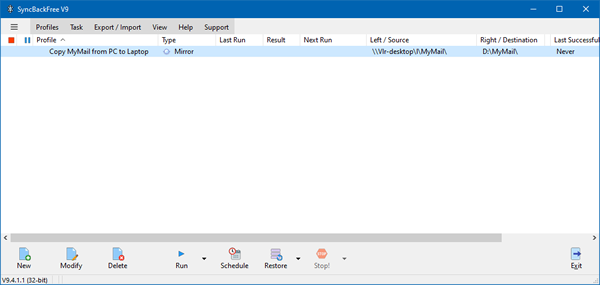
Now, whenever you need to replace the Outlook PST files on your laptop, all you need to do is highlight the “Copy MyMail from PC to Laptop” profile and then click RUN. Once you return and will be accessing your mail from your PC instead, highlight the “Copy MyMail from Laptop to PC” profile and click run to replace the PSTs on your workstation with the ones from your laptop.